介绍
此应用程序使用Tesseract 3的Tesseract OCR引擎,该引擎通过识别字符模式(https://github.com/tesseract-ocr/tesseract)来工作。Tesseract具有unicode(UTF-8)支持,可以“开箱即用”识别100多种语言。
背景
我尝试了Google文本识别API- https://developers.google.com/vision/android/text-overview,但它不适合我,所以我找到了这个惊人的引擎。
使用代码
开始吧!在Android studio中创建一个新项目(我使用的是3.2.1版),或者您可以下载源文件并选择:File-New-Import项目。

添加到build.gradle应用程序级别:
implementation 'com.jakewharton:butterknife:8.8.1'
annotationProcessor 'com.jakewharton:butterknife-compiler:8.8.1'

implementation 'com.rmtheis:tess-two:9.0.0'
我使用Butterknife库,它非常有用,主库是 - ' tess-two:9.0.0'' - 它包含一个Android的Tesseract工具(tesseract-android-tools)的分支,它增加了一些额外的功能。此外,我们需要相机和写入权限,因此将其添加到AndroidManifest.xml。
<uses-permission android:name="android.permission.WRITE_EXTERNAL_STORAGE" />
<uses-feature android:name="android.hardware.camera" />
<uses-permission android:name="android.permission.CAMERA" />
做一个简单的布局文件Button,TextView并且ImageView:
<?xml version="1.0" encoding="utf-8"?>
<ScrollView xmlns:android="http://schemas.android.com/apk/res/android"

    xmlns:tools="http://schemas.android.com/tools"

    android:layout_width="match_parent"

    android:layout_height="wrap_content"

    android:fillViewport="true"

    tools:context=".MainActivity">

    <LinearLayout

        android:layout_width="match_parent"

        android:layout_height="wrap_content"

        android:orientation="vertical">

        <LinearLayout

            android:layout_width="match_parent"

            android:layout_height="wrap_content"

            android:orientation="vertical">

            <Button

                android:id="@+id/scan_button"

                android:layout_width="wrap_content"

                android:layout_height="wrap_content"

                android:layout_gravity="center"

                android:text="scan" />
        </LinearLayout>

        <LinearLayout

            android:layout_width="match_parent"

            android:layout_height="wrap_content"

            android:layout_margin="4dp"

            android:orientation="horizontal">

            <TextView

                android:id="@+id/ocr_text"

                android:layout_width="match_parent"

                android:layout_height="wrap_content"

                android:layout_gravity="fill"

                android:text=" text">

            </TextView>

        </LinearLayout>

        <LinearLayout

            android:layout_width="match_parent"

            android:layout_height="wrap_content"

            android:orientation="vertical">

            <ImageView

                android:id="@+id/ocr_image"

                android:layout_width="match_parent"

                android:layout_height="wrap_content" />

        </LinearLayout>

    </LinearLayout>
</ScrollView>
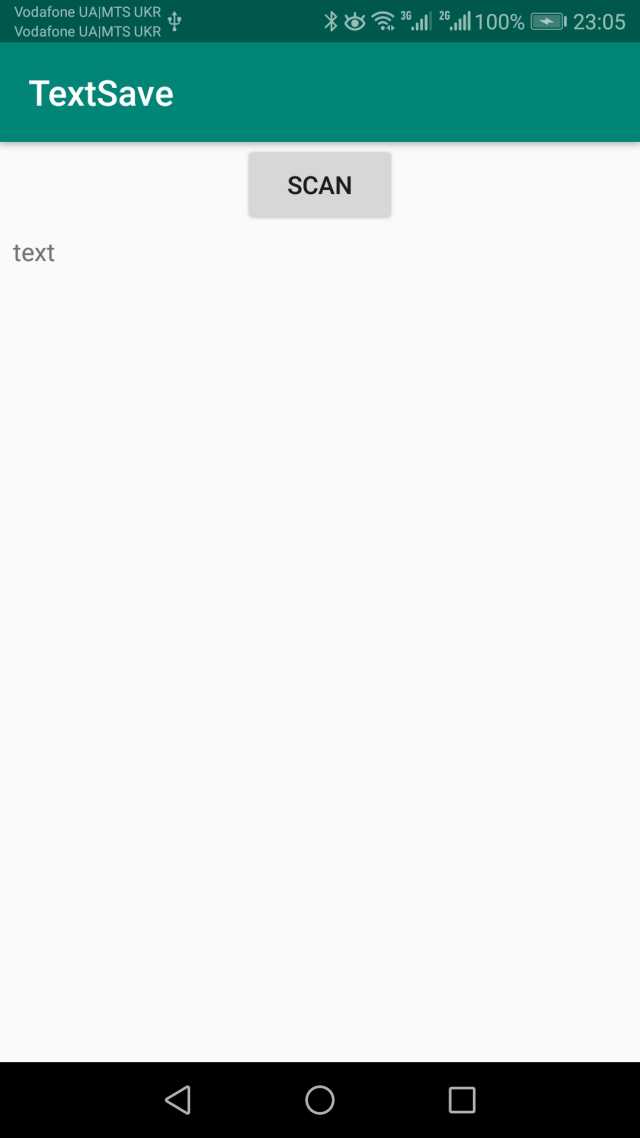
我们得到这样的东西:
编写一些代码来检查权限:
void checkPermissions() {
    if (!hasPermissions(context, PERMISSIONS)) {
        requestPermissions(PERMISSIONS,
                PERMISSION_ALL);
        flagPermissions = false;
    }
    flagPermissions = true;
}

public static boolean hasPermissions(Context context, String... permissions) {
    if (context != null && permissions != null) {
        for (String permission : permissions) {
            if (ActivityCompat.checkSelfPermission(context, permission)
                                       != PackageManager.PERMISSION_GRANTED) {
                return false;
            }
        }
    }
    return true;
}
和代码来创建一个文件:
public File createImageFile() throws IOException {
    // Create an image file name
    String timeStamp = new SimpleDateFormat("MMdd_HHmmss").format(new Date());
    String imageFileName = "JPEG_" + timeStamp + "_";
    File storageDir = context.getExternalFilesDir(Environment.DIRECTORY_PICTURES);
    File image = File.createTempFile(
            imageFileName,  /* prefix */
            ".jpg",         /* suffix */
            storageDir      /* directory */
    );
    // Save a file: path for use with ACTION_VIEW intents
    mCurrentPhotoPath = image.getAbsolutePath();
    return image;
}
首先,我们需要写onClickScanButton函数,它:
@OnClick(R.id.scan_button)
void onClickScanButton() {
    // check permissions
    if (!flagPermissions) {
        checkPermissions();
        return;
    }
    //prepare intent
    Intent takePictureIntent = new Intent(MediaStore.ACTION_IMAGE_CAPTURE);

    if (takePictureIntent.resolveActivity(context.getPackageManager()) != null) {
        File photoFile = null;
        try {
            photoFile = createImageFile();
        } catch (IOException ex) {
            Toast.makeText(context, errorFileCreate, Toast.LENGTH_SHORT).show();
            Log.i("File error", ex.toString());
        }
        // Continue only if the File was successfully created
        if (photoFile != null) {
            oldPhotoURI = photoURI1;
            photoURI1 = Uri.fromFile(photoFile);
            takePictureIntent.putExtra(MediaStore.EXTRA_OUTPUT, photoURI1);
            startActivityForResult(takePictureIntent, REQUEST_IMAGE1_CAPTURE);
        }
    }
}
我们可以在这里查看结果:
@Override
protected void onActivityResult(int requestCode, int resultCode, @Nullable Intent data) {
    super.onActivityResult(requestCode, resultCode, data);

    switch (requestCode) {
        case REQUEST_IMAGE1_CAPTURE: {
            if (resultCode == RESULT_OK) {
                Bitmap bmp = null;
                try {
                    InputStream is = context.getContentResolver().openInputStream(photoURI1);
                    BitmapFactory.Options options = new BitmapFactory.Options();
                    bmp = BitmapFactory.decodeStream(is, null, options);

                } catch (Exception ex) {
                    Log.i(getClass().getSimpleName(), ex.getMessage());
                    Toast.makeText(context, errorConvert, Toast.LENGTH_SHORT).show();
                }

                firstImage.setImageBitmap(bmp);
                doOCR(bmp);

                OutputStream os;
                try {
                    os = new FileOutputStream(photoURI1.getPath());
                    if (bmp != null) {
                        bmp.compress(Bitmap.CompressFormat.JPEG, 100, os);
                    }
                    os.flush();
                    os.close();
                } catch (Exception ex) {
                    Log.e(getClass().getSimpleName(), ex.getMessage());
                    Toast.makeText(context, errorFileCreate, Toast.LENGTH_SHORT).show();
                }

            } else {
                {
                    photoURI1 = oldPhotoURI;
                    firstImage.setImageURI(photoURI1);
                }
            }
        }
    }
}
接下来将Tesseract集成到我们的项目中,进行额外的课程:TesseractOCR。
我在Assets文件夹中为英语语言添加了训练有素的数据文件“ eng.traineddata ” ,因此我们需要将其从APK复制到内部存储器文件目录,然后启动Tesseract系统:。mTess.init(dstInitPathDir, language)
public class TesseractOCR {

    private final TessBaseAPI mTess;

    public TesseractOCR(Context context, String language) {
        mTess = new TessBaseAPI();
        boolean fileExistFlag = false;

        AssetManager assetManager = context.getAssets();

        String dstPathDir = "/tesseract/tessdata/";

        String srcFile = "eng.traineddata";
        InputStream inFile = null;

        dstPathDir = context.getFilesDir() + dstPathDir;
        String dstInitPathDir = context.getFilesDir() + "/tesseract";
        String dstPathFile = dstPathDir + srcFile;
        FileOutputStream outFile = null;

        try {
            inFile = assetManager.open(srcFile);

            File f = new File(dstPathDir);

            if (!f.exists()) {
                if (!f.mkdirs()) {
                    Toast.makeText(context, srcFile + " can't be created.", Toast.LENGTH_SHORT).show();
                }
                outFile = new FileOutputStream(new File(dstPathFile));
            } else {
                fileExistFlag = true;
            }

        } catch (Exception ex) {
            Log.e(TAG, ex.getMessage());

        } finally {

            if (fileExistFlag) {
                try {
                    if (inFile != null) inFile.close();
                    mTess.init(dstInitPathDir, language);
                    return;

                } catch (Exception ex) {
                    Log.e(TAG, ex.getMessage());
                }
            }

            if (inFile != null && outFile != null) {
                try {
                    //copy file
                    byte[] buf = new byte[1024];
                    int len;
                    while ((len = inFile.read(buf)) != -1) {
                        outFile.write(buf, 0, len);
                    }
                    inFile.close();
                    outFile.close();
                    mTess.init(dstInitPathDir, language);
                } catch (Exception ex) {
                    Log.e(TAG, ex.getMessage());
                }
            } else {
                Toast.makeText(context, srcFile + " can't be read.", Toast.LENGTH_SHORT).show();
            }
        }
    }

    public String getOCRResult(Bitmap bitmap) {
        mTess.setImage(bitmap);
        return mTess.getUTF8Text();
    }

    public void onDestroy() {
        if (mTess != null) mTess.end();
    }
}
OCR代码很简单 - 我们需要将图像(位图BMP)传递给该对象并获得结果:
public String getOCRResult(Bitmap bitmap) {
mTess.setImage(bitmap);
return mTess.getUTF8Text(); }
OCR可能需要很长时间,因此我们需要在另一个中进行Thread:
private void doOCR(final Bitmap bitmap) {
    if (mProgressDialog == null) {
        mProgressDialog = ProgressDialog.show(this, "Processing",
                "Doing OCR...", true);
    } else {
        mProgressDialog.show();
    }
    new Thread(new Runnable() {
        public void run() {
            final String srcText = mTessOCR.getOCRResult(bitmap);
            runOnUiThread(new Runnable() {
                @Override
                public void run() {

                    if (srcText != null && !srcText.equals("")) {
                        ocrText.setText(srcText);
                    }
                    mProgressDialog.dismiss();
                }
            });
        }
    }).start();
}
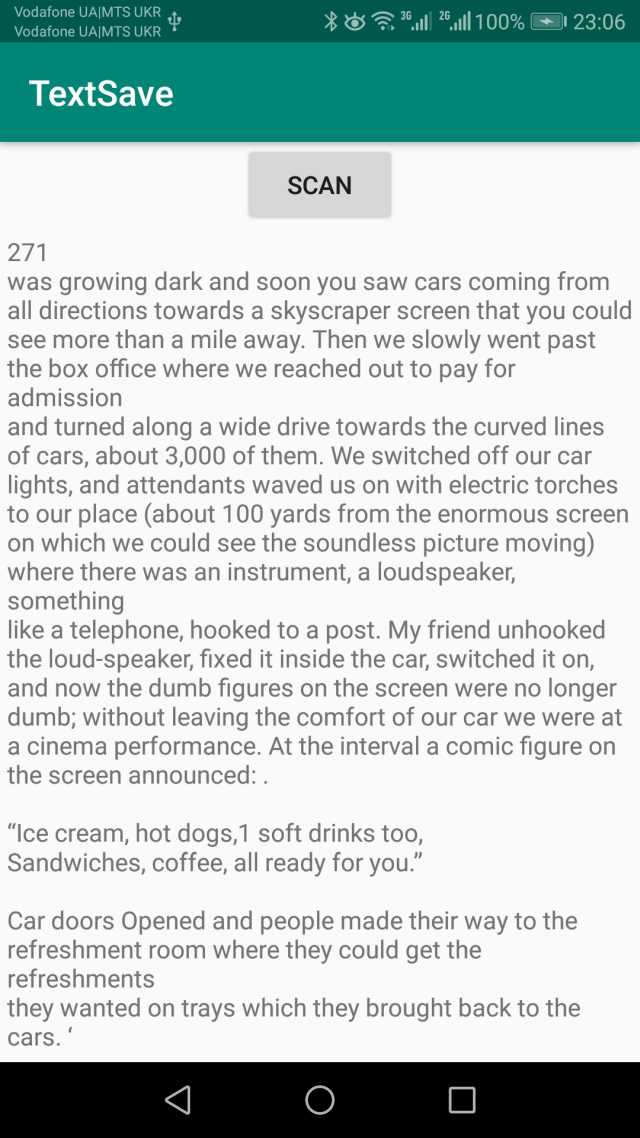
源图像如下:

OCR的结果如下:
技术博客阅读排行
-

2016-09-10
-

使用C ++ 11线程支持库创建带有事件循环,消息队列和计时器的辅助线程
2020-09-14
-

快速集成MQTT协议到Android客户端,只需要简单的几个步骤,无需关
2016-09-22
-

2021-01-24
-

2020-12-20
-

2018-04-01
-
2020-08-02
-

2017-01-05
最新文章
-
React Native 启动速度优化――JS 篇【全网最全,值得收藏】
2021-04-19
-
2021-01-24
-
2020-12-20
-

2020-12-19
-
2020-09-14
-
使用C ++ 11线程支持库创建带有事件循环,消息队列和计时器的辅助线程
2020-09-14
-

2020-08-29
-
2020-08-09
热门源码