概述
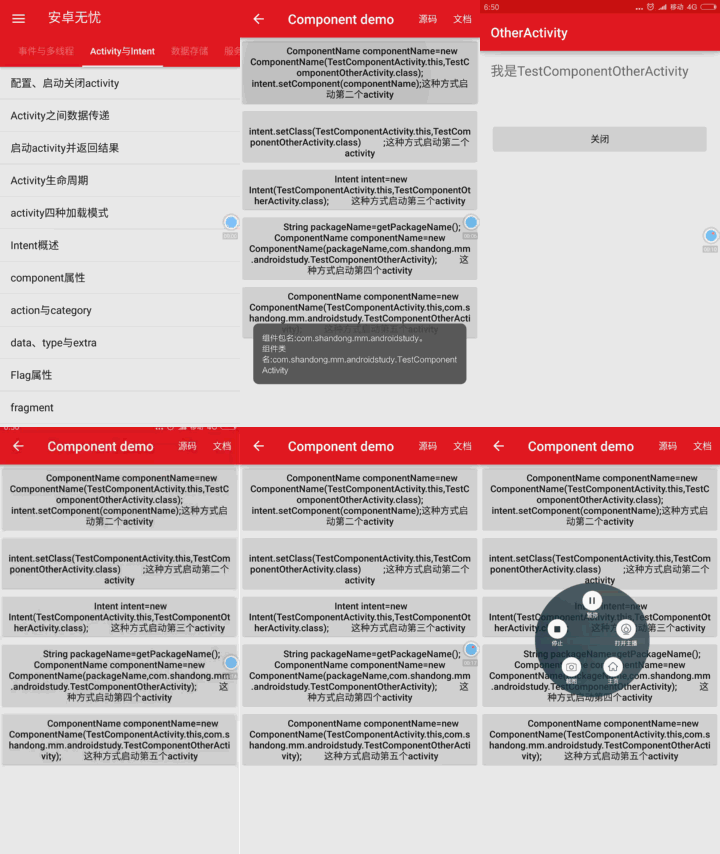
在介绍Component之前,我们首先来了解ComponentName这个类;ComponentName与Intent同位于android.content包下,我们从Android官方文档中可以看到,这个类主要用来定义可见一个应用程序组件,例如:Activity,Service,BroadcastReceiver或者ContentProvider。
那么,如何用ComponentName来定义一个组件呢。这是ComponentName的构造函数:ComponentName(String pkg,String cls) 。我们知道在Android应用程序中如果要详细描述一个组件我们需要知道该组件所在的应用包名,也就是在AndroidManifest.xml文件中manifest根结点下的package=“XXX.XXXXX.XXXXX",还有组件在应用程序中的完整路径名,拿Activity来说,也就是activity节点中name属性的值。因此到这里我们也就明白了可以使用ComponentName来封装一个组件的应用包名和组件的名字。
我们已经知道,在Android中组件之间的交流往往使用意图(Intent)来完成的,那么在Intent中有一个方法可以封装一个ComponentName,最后我们在使用意图去完成我们需要实现的功能。

Demo代码
|
1
2
3
4
5
6
7
8
9
10
11
12
13
14
15
16
17
18
19
20
21
22
23
24
25
26
27
28
29
30
31
32
33
34
35
36
37
38
39
40
41
42
43
44
45
46
47
48
49
|
package mm.shandong.com.testcomponent;import android.content.ComponentName;import android.content.Intent;import android.support.v7.app.AppCompatActivity;import android.os.Bundle;import android.view.View;import android.widget.Toast;public class TestComponentActivity extends AppCompatActivity { @Override protected void onCreate(Bundle savedInstanceState) { super.onCreate(savedInstanceState); setContentView(R.layout.activity_test_component); ComponentName componentName=getIntent().getComponent(); Toast.makeText(this,"组件包名:"+componentName.getPackageName()+ "。\n组件类名:"+componentName.getClassName(),Toast.LENGTH_LONG).show(); } public void startActivityFirst(View view){ Intent intent=new Intent(); ComponentName componentName=new ComponentName(TestComponentActivity.this,TestComponentOtherActivity.class); intent.setComponent(componentName); startActivity(intent); } public void startActivitySecond(View view){ Intent intent=new Intent(); intent.setClass(TestComponentActivity.this,TestComponentOtherActivity.class); startActivity(intent); } public void startActivityThird(View view){ Intent intent=new Intent(TestComponentActivity.this,TestComponentOtherActivity.class); startActivity(intent); } public void startActivityFourth(View view){ Intent intent=new Intent(); String packageName=getPackageName(); ComponentName componentName=new ComponentName(packageName,"mm.shandong.com.testcomponent.TestComponentOtherActivity"); intent.setComponent(componentName); startActivity(intent); } public void startActivityFifth(View view){ Intent intent=new Intent(); ComponentName componentName=new ComponentName(TestComponentActivity.this,"mm.shandong.com.testcomponent.TestComponentOtherActivity"); intent.setComponent(componentName); startActivity(intent); }}
|
123456789101112131415161718192021222324252627282930313233343536373839404142434445 |
|
appsend中的启动Activity的片段:
1234567891011 |
|
.componentName(组件名称),指定Intent的目标组件的类名称。组件名称是可选的,如果填写,Intent对象会发送给指定组件名称的组件,否则也可以通过其他Intent信息定位到适合的组件。组件名称是个ComponentName类型的对象。
用法:
Intent intent = new Intent();
// 构造的参数为当前Context和目标组件的类路径名
ComponentName cn = new ComponentName(HelloActivity.this, "com.byread.activity.OtherActivity");
intent.setComponent(cn);
startActivity(intent);
相当于以下常用方法:
Intent intent = new Intent();
intent.setClass(HelloActivity.this, OtherActivity.class);
startActivity(intent);
Intent类中也包含一个初始化ComponentName的构造函数:
public Intent(Context packageContext, Class<?> cls) {
mComponent = new ComponentName(packageContext, cls);
}
Android开发Intent属性详解一 component属性 转载https://www.codesocang.com/appboke/33692.html
热门源码


