CSS3中的5个有趣的新技术
时间:2014-09-19 09:05 来源: 作者: 收藏
网页制作Webjx文章简介:网页教学网将在这篇文章向大家展示CSS中的5个有趣的新技术:圆角、个别圆角、不透明度、阴影和调整元素大小. CSS是众所周知且应用广泛的网站样式语言,在它的版本三(CSS3)计划中,新增了一些能够节省时
网页制作Webjx文章简介:网页教学网将在这篇文章向大家展示CSS中的5个有趣的新技术:圆角、个别圆角、不透明度、阴影和调整元素大小.
CSS是众所周知且应用广泛的网站样式语言,在它的版本三(CSS3)计划中,新增了一些能够节省时
脚本之家将在这篇文章向大家展示CSS中的5个有趣的新技术:圆角、个别圆角、不透明度、阴影和调整元素大小.
CSS是众所周知且应用广泛的网站样式语言,在它的版本三(CSS3)计划中,新增了一些能够节省时间的特性。尽管只有当前最新了浏览器版本才能支持这些效果,但了解它们还是必须且很有趣味性的。脚本之家将在这篇文章向大家展示CSS中的5个有趣的新技术:圆角、个别圆角、不透明度、阴影和调整元素大小。
相关文章:介绍CSS3使用技巧5个 1:基本标记
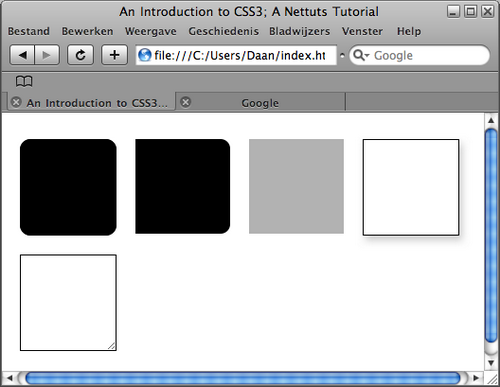
在我们开始这个教程之前,先来创建整个教程都要使用的基本标记。
我们的xHTML需要一下div元素: #round, 使用CSS3代码实现圆角. #indie, 应用个别的几个圆角. #opacity, 展示新的CSS3实现不透明度的方式. #shadow,展示不使用Photoshop的情况下,使用CSS3来实现阴影效果. #resize, 展示如何使用某种CSS来实现重设大小的效果.
综上所述,我们的xHTML应该是这样的:
脚本之家将在这篇文章向大家展示CSS中的5个有趣的新技术:圆角、个别圆角、不透明度、阴影和调整元素大小.
CSS是众所周知且应用广泛的网站样式语言,在它的版本三(CSS3)计划中,新增了一些能够节省时间的特性。尽管只有当前最新了浏览器版本才能支持这些效果,但了解它们还是必须且很有趣味性的。脚本之家将在这篇文章向大家展示CSS中的5个有趣的新技术:圆角、个别圆角、不透明度、阴影和调整元素大小。
相关文章:介绍CSS3使用技巧5个 1:基本标记

在我们开始这个教程之前,先来创建整个教程都要使用的基本标记。
我们的xHTML需要一下div元素: #round, 使用CSS3代码实现圆角. #indie, 应用个别的几个圆角. #opacity, 展示新的CSS3实现不透明度的方式. #shadow,展示不使用Photoshop的情况下,使用CSS3来实现阴影效果. #resize, 展示如何使用某种CSS来实现重设大小的效果.
综上所述,我们的xHTML应该是这样的:
<!DOCTYPE html PUBLIC “-//W3C//DTD XHTML 1.0 Transitional//EN” “http://www.w3.org/TR/xhtml1/DTD/xhtml1-transitional.dtd”>
<html xmlns=”http://www.w3.org/1999/xhtml”>
<head>
<meta http-equiv=”Content-Type” content=”text/html; charset=utf-8″ />
<title>An Introduction to CSS3; A Nettuts Tutorial</title>
<link href=”style.css” rel=”stylesheet” type=”text/css” />
</head>
<body>
<div id=”wrapper”>
<div id=”round”> </div>
<div id=”indie”> </div>
<div id=”opacity”> </div>
<div id=”shadow”> </div>
<div id=”resize”>
<img src=”image.jpg” title="css3-特性" height="249" width="498" src="http://p1.codesocang.com/uploads/allimg/c140626/1403M442E4610-41119.png" />
目前而言,创建圆角的方法有很多,但都很麻烦。最常用的方法:首先,你要创建圆角的图片;然后,你要创建很多html元素并使用背景图像的方式显示圆角。具体流程你我都很清楚。
这个问题将在CSS3中很简单的解决掉,那就是叫做“border-radius”的属性。我们先创建一个黑色的div元素并给他设置黑色的边框。边框就是要实现“border-radius”属性效果的前提。
像这样:
#round {
background-color: #000;
border: 1px solid #000;
}
现在你已经创建了div元素,它看起来和你预期的样子一样,300px款和高有楞有角且是黑色的。下面我们来添加实现圆角的代码,它是如此的简洁,仅仅需要两行代码。
#round {
background-color: #000;
border: 1px solid #000;
-moz-border-radius: 10px;
-webkit-border-radius: 10px;
}
在这里,我们添加了两行类似的代码,-moz-适用于Firefox浏览器,而-webkit-则是用于Safari/Chrome浏览器。
注:目前为止IE浏览器不支持border-radius属性,所以如果想让IE也有圆角效果,那么就要单独添加圆角了。
border-radius这个属性直译过来是边框半径的意思,就如同Photoshop一样,它的值越大,圆角也就越大。
上一页12 3 下一页
上一篇:介绍CSS3使用技巧5个
热门源码


